Office 365 / Azure Active Directory configuration
In order to enable logging into Investigate with Office 365 / Azure Active Directory credentials, you will need to:
-
decide how Active Directory groups will be mapped to Search Guard FLX groups;
-
create an App Registration for Investigate;
-
configure Search Guard FLX to validate tokens issued by Active Directory;
-
configure Investigate to handle user authentication through Active Directory.
App Registration
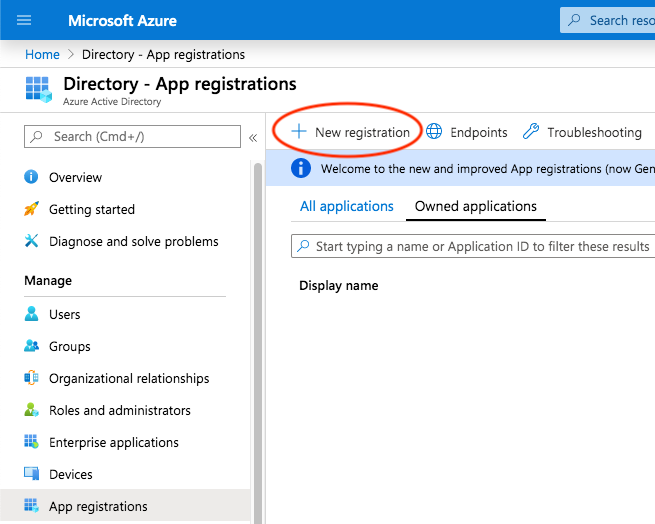
In order to create a new App Registration, login to the Azure portal and switch to the Active Directory blade; then, select App Registrations and click on New registration:
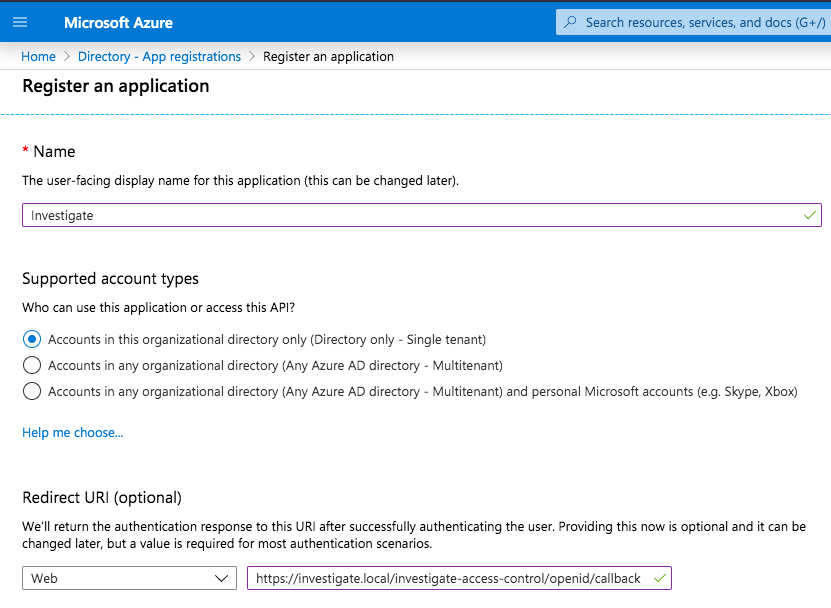
Enter an appropriate display name (e.g. Investigate) and select the
supported account types, which will be Accounts in this organization
directory only for most use cases.
The Redirect URI must be specified as <public Investigate
URL>/investigate-access-control/openid/callback; for example, if users are
opening Investigate at https://investigate.local, the Redirect URI will be
https://investigate.local/investigate-access-control/openid/callback, e.g.
:
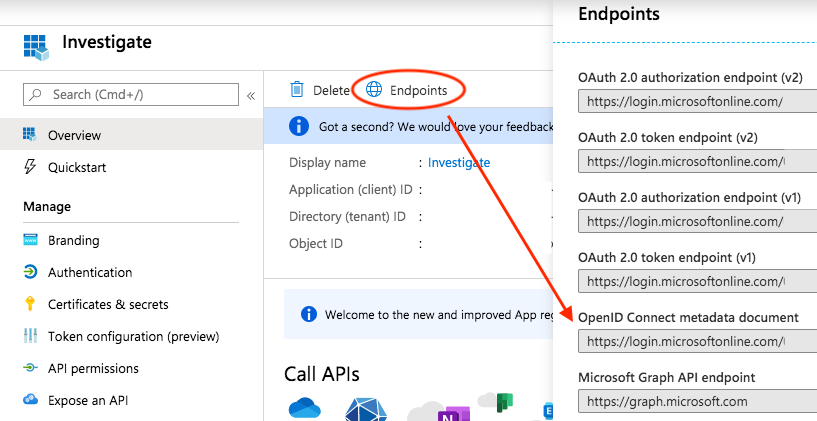
Take a note of the App Registration parameters, in particular the Application (client) ID; this is the client identifier that Investigate will use to retrieve the information about a logged in user.

Then, click on Endpoints and take a note of the OpenID Connect metadata document URL, which is the discovery URL for the App Registration:
In order to put Active Directory groups in the ID token, open the App Registration and click on Token Configuration:
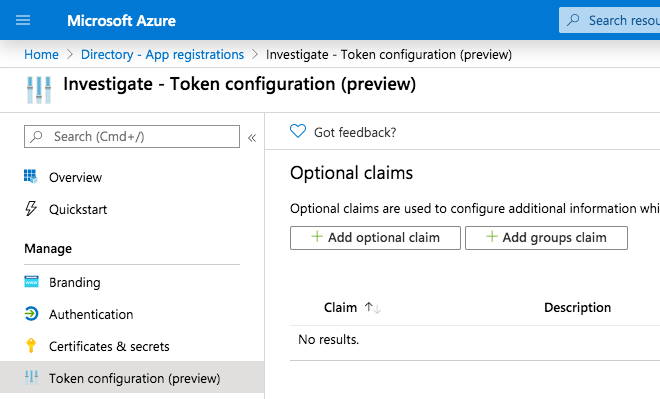
Then click on Add groups claim and add the Group ID to the ID token:
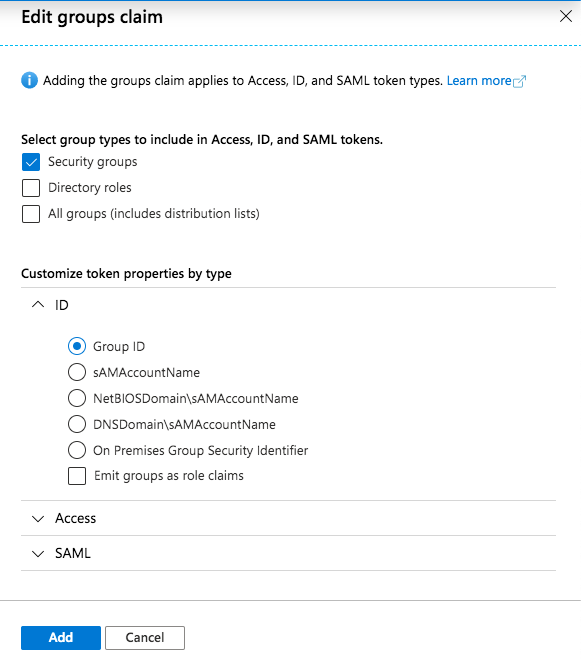
Depending on your authorization needs, you can also add Directory Roles or All Groups instead of just groups.
Finally, you’ll need to create a set of credentials to grant Investigate the permission to initiate the authentication flow; in order to create the credentials, click on Certificates and secrets and then on New client secret.

Take a note of the secret as it won’t be displayed anymore and make sure to set a reminder when the secret expires as authentication will stop working.
Search Guard FLX configuration
Group mapping
Active Directory groups can be mapped to Search Guard FLX roles by altering the
sg_roles_mapping.yml file in the Search Guard FLX configuration directory; for
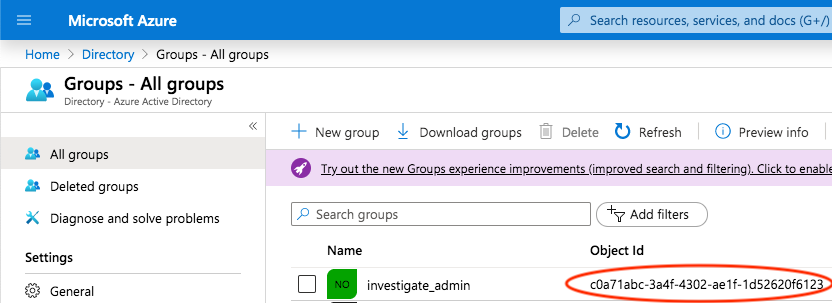
example, if you want to map the investigate_admin role to an Active
Directory group with the ID c0a71abc-3a4f-4302-ae1f-1d52620f6123, the
Active Directory group id needs to be added to the backendroles list:
investigate_admin:
  users:
  - sirenadmin
  backendroles:
  - 'c0a71465-3a4f-4302-ae1f-1d52620f6abc'
The identifiers of Active Directory groups can be retrieved from the Active Directory blade on Azure by clicking on Groups:
OpenID Connect settings
The following sample sg_config.yml configures Search Guard FLX to work with
Azure Active Directory claims
; make sure to set the correct openid_connect_url by pasting
the value of the OpenID connect metadata document endpoint.
searchguard:
  dynamic:
    respect_request_indices_options: true
    kibana:
      do_not_fail_on_forbidden: true
    http:
      anonymous_auth_enabled: false
      xff:
        enabled: false
    authc:
      # The standard authentication domain using the internal user database
      basic_internal_auth_domain:
        http_enabled: true
        transport_enabled: true
        order: 0
        http_authenticator:
          type: basic
          challenge: false
        authentication_backend:
          type: internal
      # The additional OpenID connect authentication domain
      openid_auth_domain:
        http_enabled: true
        transport_enabled: true
        order: 1
        http_authenticator:
          type: openid
          challenge: false
          config:
            # The name of the ID token claim that contains the unique user identifier
            subject_key: sub
            # The name of the ID token claim that contains the user's Active Directory groups;
            # these will be available in mapping rules as `backendroles`.
            roles_key: groups
            # The discovery URL taken from the App Registration's "OpenID Connect metadata document" endpoint.
            openid_connect_url: "https://login.microsoftonline.com/abcd/v2.0/.well-known/openid-configuration"
            enable_ssl: true
            verify_hostnames: true
        # User information is provided in tokens so there's no need for any
        # authentication backend.
        authentication_backend:
          type: noop
Once you have modified sg_config.yml and sg_roles_mapping.yml, they will
need to be uploaded to the cluster using sgadmin.
Siren Investigate configuration
To configure Siren Investigate to work with Azure Active Directory, you will
need to set the following variables under the investigate_access_control
section:
-
public_url: the URL used by end users to open Investigate. -
normalize_username: set to `true. This applies the same character normalization rules for usernames as Active Directory. -
backends.searchguard.authenticator: set toopenid. -
backends.searchguard.openid.discovery_url: set to the OpenID Connect metadata document URL from the App Registration endpoints in Azure. -
backends.searchguard.openid.client_id: set to the Application (client) ID from the App Registration overview. -
backends.searchguard.openid.client_secret: set to the client secret generated in the App Registration’s "Certificates & Secrets" section. -
session.backend: this can be left tofalsein most scenarios; if you’re experiencing issues initiating a session because the ID token contains a very large number of roles, it is advised to set it totrue.
Example configuration:
investigate_access_control:
  enabled: true
  public_url: "https://investigate.local/investigate"
  normalize_username: true
  acl:
    enabled: true
  admin_role: investigate_admin
  session:
    backend: false
  cookie:
    name: 'kac'
    password: '12345678123456781234567812345678'
    secure: true
  backend: searchguard
  backends:
    searchguard:
      authenticator: openid
      openid:
        discovery_url: "https://login.microsoftonline.com/abcd/v2.0/.well-known/openid-configuration"
        client_id: "123-abc-123"
        client_secret: "secret"
Restart Investigate after applying the changes to the
investigate_access_control section.
If the configuration is correct, when opening Investigate you should be redirected to a login page on microsoft.com:
After approval, the user should be logged into Investigate and should have the expected Search Guard FLX roles (displayed as Elasticsearch roles) - The GUIDs of the Active Directory groups should be listed in the list of DLS roles.

Elasticsearch logging configuration
With both basic authentication and OpenID Connect enabled, several versions of Search Guard FLX will log many warnings such as:
[...][WARN ][c.f.o.s.h.HTTPBasicAuthenticator] [iUzXe2s] No 'Basic Authorization' header, send 401 and 'WWW-Authenticate Basic'To silence those warnings, you can add the following lines to the
log4j2.properties file in the Elasticsearch configuration directory on each
node:
logger.basicauth.name = com.floragunn.searchguard.http.HTTPBasicAuthenticator
logger.basicauth.level = ERROR
Troubleshooting
If the OpenID Connect discovery URL is incorrect, Investigate will display a status page with a discovery error. If that happens, head to the Endpoints page of the App Registration blade and double check it has been pasted correctly, then restart Investigate.
If the OpenID client_id is incorrect, you will get an "Application not
found" error from microsoft.com; if the client ID is correct but the secret
is not, Investigate won’t be able to initiate the authentication flow and
will display a generic 401 error instead of redirecting to microsoft.com.
If you get an authorization error after approving the login request on
microsoft.com, first check that the value of openid_connect_url in the
Search Guard FLX configuration is correct by looking at Elasticsearch logs; if
the URL is incorrect, you will see a KeySetProvider threw error message and
details about the request failure.
If there are no errors related to the OpenID Connect discovery URL, a common
error is that the subject_key option is set to a claim name that is not
present in the ID token issues by Active Directory; when that happens, you
will see a warning like the following:
...[WARN ][.AbstractHTTPJwtAuthenticator] [iUzXe2s] Failed to get subject from JWT claims, check if subject_key '<value of subject_key>' is correct.
...[ERROR][.AbstractHTTPJwtAuthenticator] [iUzXe2s] No subject found in JWT token
If the user is authenticated but it does not have the expected roles, make sure that:
-
roles_keyis set togroups; -
sg_roles_mapping.ymlcontains rules mapping the group identifiers to Search Guard FLX roles; -
the groups claim is added to the ID token by the App Registration token configuration in the Azure Portal.
ID token inspection
If you need to inspect the ID token, you can execute the authorization code flow using your browser and Postman.
First, download and install Postman from https://www.postman.com/downloads/ .
Then, open the Active Directory developer documentation at https://docs.microsoft.com/en-us/azure/active-directory/develop/v2-oauth2-auth-code-flow#request-an-access-token and click on Run in Postman to get the Azure AD v2.0 Protocols collection.
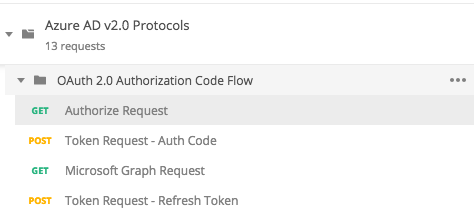
Expand OAuth 2.0 Authorization Code Flow and select Authorize Request, then set Query params as follows:
-
client_id: the App Registration client ID. -
response_type:code. -
response_mode:query. -
scope:openid. -
redirect_uri: the Investigate redirect URI that was set in the App Registration (e.g. 'https://investigate.local/investigate-access-control/openid/callback'). -
state: a random number.
Replace common in the Postman URL with with the Tenant ID that can be
retrieved from the App Registration homepage and save the request:
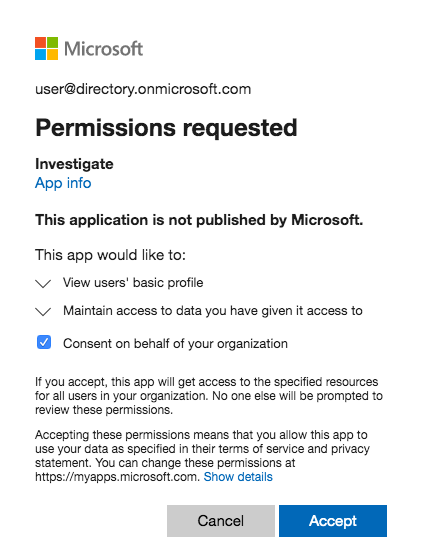
Then, stop Investigate and open the URL in your browser and log in; after
consent, copy the value of the code parameter in the redirect URL
querystring:

Switch back to Postman and select the Token Request - Auth Code request, then set Body parameters as follows:
-
client_id: the App Registration client ID. -
scope:openid. -
redirect_uri: the Investigate redirect URI that was set in the App Registration (e.g. 'https://investigate.local/investigate-access-control/openid/callback'). -
grant_type:authorization_code. -
client_secret: the client secret set in the Investigate configuration. -
code: the code copied from the querystring in the previous step.
Replace common in the Postman URL with with the Tenant ID that can be
retrieved from the App Registration homepage and save the request.
Click on Send to send the request; you should get a JSON encoded response containing the access token and ID token.
You can now paste the encoded token into a tool like https://jwt.ms to inspect its claims.
|
An authorization code can be used only once, so if you want to repeat the request you’ll have to request a new authorization code by repeating the steps above. |